 Troubleshooting Your Window Air-Conditioner
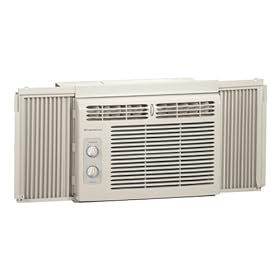
Window Mount Conditioners
If you use a window-mounted air-conditioner to keep your home cool, you know how powerful these little devices can be. Like a central AC system, a window air-conditioner has both indoor and outdoor components and when something goes wrong it can be difficult to determine where the problem lies.
Understanding Your Air-Conditioner
Inside the room you will find the evaporator coil, the part of the AC that gets cold, along with the fan or blower, the thermostat and controls, the filter and a plastic face panel.
Between the interior and exterior components is a panel that helps seal the unit in the window, preventing cool air from escaping and warm air from seeping in. This panel is usually expandable, so it is easy to customize the device to fit into your window, no matter what its size.
On the outside, you will find the air-conditioner’s compressor, the condenser and the fan that blows air across the condensing coil in order to cool it. Any moisture that collects inside the unit drains along the bottom and into a metal basin, which then drips to the outside of the house, through a hole or drain tube.
Now that you know the basics, it is time to take a look at some common in-room air-conditioner problems.
Water Dripping From the Front Panel
If you notice excess condensation or water dripping from the front of your air-conditioner, it almost always means that the drain pan is tilted incorrectly. Instead of guiding water toward the back of the unit and out of your home, the basin is allowing condensation to drain into the room.
Fortunately, correcting this problem is pretty simple. You just have to adjust the drain basin so that it tilts to the back of the unit and downward.
The Unit Cycles on and off Too Frequently
This generally indicates a problem with the unit’s thermostat or temperature sensor. Possible solutions include checking that the temperature sensor is positioned properly; near but not touching the evaporator coil. Move drapes and curtains away from the front panel. Remove leaves, branches and yard debris away from the exterior condenser. If none of these suggestions resolves the problem, call in a professional to service your AC unit, checking for refrigerant leaks and damaged components
Air-Conditioner Will Not Turn On
You could have a blown fuse, it could be a popped circuit breaker or the unit could be unplugged.
Obviously, you first want to make sure the air-conditioner is plugged in properly. If this fails to solve the problem you may have to replace the blown fuse or reset the breaker that connects to your AC’s power source.
Unit Keeps Blowing Fuses
If your AC is constantly popping the circuit breaker or blowing out fuses it usually means that it is hooked up to an inadequate power source.
Most residential window units require at least 120 volts of electricity operating off a 15amp circuit. You will need more power if your AC is larger. Run the air-conditioner from its own dedicated circuit; at least 20 amps, in order to correct the problem.
Related Air Conditioning Information from Horizon Services...
Home Energy Hogs
 These Home Appliances Suck Up a Surprising Amount of Electricity!
When we think of energy consuming appliances, big ticket items such as refrigerators, air conditioners and washing machines tend to top the list. However, some of the most costly appliances in your home are actually the smallest. Small devices like cell phone chargers and computer printers use lots of energy, and as these gadgets become more common in our homes the amount of energy they use grows exponentially.
What is the main reason so many of these small appliances use so much power? It is because they are almost always plugged into electrical outlets, even when they are not in use. They draw energy constantly, even when they are turned off or the devices they power have been disconnected.
Check out our list of the most energy inefficient small appliances. How many do you have in your home?
Plasma TVs:
You know you want one. Plasma televisions are on most of our home entertainment wish lists, but these hot items are quite literally hot. They use a lot of energy and throw off a significant amount of heat, too. The average 42-inch plasma screen uses as much as 325 watts of electricity; that old-fashioned CRT TV you have lying around uses just 120 watts. LCD TVs are a good compromise, using about 200 watts of electricity.
Digital Photo Frames:
Once a novelty item, digital picture frames are quickly becoming more commonplace as they become more affordable. However, according to a recent estimate from the Electric Power Research Institute, if every home in the US had one of these frames operating 24 hours a day it would take five entire power plants to keep them all running.
Video Game Consoles:
Video games have come a long way since Pac Man and Pong. Today’s games require high level digital processors to control all of those stunning graphics, and those processors require tons of energy. Compounding the problem is that energy-efficiency standards have yet to catch up to video game consoles like Sony’s PlayStation and Microsoft’s Xbox 360. The Natural Resources Defense Council estimates that game consoles consume around 16 billion kilowatt hours of electricity each year. This is roughly the same amount of yearly energy usage as the entire city of San Diego.
Set-Top Boxes:
Cable and digital converter boxes for your television may seem like pretty innocuous devices. While they only draw about 30 watts of energy, these boxes are always on—even when the TV is turned off. A single box can use as much as 265 kilowatt hours of electricity in a year. This is equal to the annual energy consumption of a 28-inch tube television.
Battery Chargers:
It seems that everything that rings, beeps or clicks now comes with its very own battery charger. Although these small devices do not use much energy—only about 10 watts—most of us simply plug them into the wall and leave them there, connecting them to the phone, camera or portable DVD player only when we need a charge. Even when there is nothing attached to them, battery chargers continuously draw power if they are plugged in. Consider the fact that most American homes have at least half a dozen chargers, and our total energy consumption adds up to the output of several large power plants.
Related Energy Efficiency Information from Horizon Services...
- Horizon Heating Services
- Horizon Air Conditioning Services
- 101 Ways to Save Energy and Money in Your Home
- Air Conditioning Alternatives
- Cutting Edge Solutions For Energy Efficiency
- Do The Math…High Efficiency Air Conditioners Drastically Reduce Energy Costs!
- Home Energy Myths Debunked!
- Frugal Fridge Maintenance Can Save You Energy...and Cold Hard Cash!
- A Precision Tune-Up is Your Air Conditioner's Best Friend!
- 14 Web Sites That Can Save You Energy, Money and Time
How to Avoid Fraudulent Home Improvement Contractors
 Protect Yourself and Your Home from Contractor Rip-offs, Scams and Shoddy Work!
As winter comes to a welcome end and we enter the spring season, homeowners inevitably will be besieged by offers, promotions and come-ons from all kinds of home improvement contractors and installers – plumbing, air conditioning, doors, windows, remodelers, landscapers -- you name it. Most will be legit...but some won't be.
Unfortunately, fraudulent contractors are extremely common in the home improvement industry…and they really seem to come out of the woodwork around this time of year. Because this area is so specialized and intimidating to many homeowners, it is easy to get taken advantage of by a disreputable “professional.”
Whether you are looking for a home improvement contractor to perform routine repairs, install equipment or perform major reconstruction and remodeling, here are a few simple tips to ensure that your home improvement contractor or installer is on the up and up.
Get It In Writing
Make sure to thoroughly read and understand the written contract for your home improvement project before you sign. Discuss your questions and get clarification. If you are not given an estimate and a contract in writing, or if your contractor is unwilling to explain things to you clearly, hire someone else. If you don’t understand a contract, don’t sign it; you could obligate yourself to repairs that you are not prepared to pay for. And don’t give any oral commitments to any work; as Yogi Berra once said, “An oral contract ain’t worth the paper it’s written on!”
Cheaper is Not Always Better
When it comes to home improvements, you almost always get what you pay for. Be wary of contractors that promise things that sound too good to be true. If your instincts tell you something strange is is up, you are probably right. Cheap contractors usually use cheap materials, sell cheap equipment and employ cheap, inexperienced, low-quality labor. And that can cost you a lot more in the long run -- both in operation costs and in future repairs.
Fraudulent contractors often try to scare homeowners with news of urgent or emergency repairs…or fantastic deals that you must act upon immediately. Do not let anyone pressure you into costly repairs on the spot; seek a second or third opinion to be sure. Always shop around and get multiple estimates. Focus on getting the best value; not the best price.
Check Credentials
Is your contractor properly licensed? Can he get all the permits to legally perform your home improvement or repair? Does he have a favorable rating from the Better Business Bureau? Does he belong to professional and industry trade organizations? Does he follow the industry’s best practices? Reputable contractors can answer yes to all these questions.
Get a Referral
Word of mouth is crucial in hiring a good contractor, but you have to be sure your referral is coming from a reputable source. Never base your decision on the word of a solicitor or stranger. Instead, ask friends, family members and neighbors, or consult a referral service that provides the names and contact information for qualified, pre-screened professionals in your area. Do not just go for the cheapest price estimate—take the time to get a solid referral; you could save thousands, especially if that amazing deal offered by the door-to-door salesman turns out to be a fraud. The best home improvement contractors have been in the business for some years and have a track record of customer satisfaction.
Read Home Improvement Contractor Reviews
There are plenty of websites that offer unbiased customer reviews of local businesses and contractors – among them Yelp, Insider Pages, Angie’s List, Local.com – as well as business directory sites (Yellowpages.com etc.) and search engines like Google, Yahoo and Bing. Take the time to go to these sites and check out reviews. Click Here to View a List of Customer Review Sites!
Beware of “Travelers”
“Travelers” are door-to-door solicitors that come knocking in hopes of gaining your trust and your business; this is one of the most common contractor frauds. These scam artists will talk fast, promising steep discounts on everything from roofing to bathroom remodeling. They will often cite their exclusive access to overstock building supplies as the reason for their great deals. The best way to protect yourself is to politely decline the sales pitch from the start, but you can also check the yellow pages for the name and number of the contractor at your door. If you cannot find a listing, tell him to hit the bricks.
Never Pay Up Front
No reputable contractor or installer will ever ask for payment until after the work is completed to your satisfaction, and will never require cash payment. If your contractor asks for payment up front or insists on doing a cash-only business, find a new contractor.
Do Not Get Your Own Building Permits
Another common tactic employed by fraudulent contractors is to request that you secure any necessary building permits yourself. A good contractor will do this for you — that is why you are paying him to do the work.
If You Are a Victim of a Fraudulent Contractor...
If you think you have been a victim of a fraudulent contractor, take immediate action to fix the situation. Consult a lawyer to find out if you have any legal recourse and report the incident to your local Chamber of Commerce and the Better Business Bureau. You may also need to involve local law enforcement if you believe a crime such as larceny or identity theft has been committed.
Check Out Our Contractor Checklist!
Horizon Services offers a 21-Point Contractor Checklist covering all the primary questions you need to ask BEFORE you select any home improvement contractor. It’s MUST-READING for all homeowners thinking of making any home improvement. Click Here!
Related Contractor Information from Horizon Services…
- Horizon HVAC Installation and Replacement
- Horizon Plumbing, Heating and Air Conditioning Services
- The Horizon Difference
- How To Choose The Right Contractor
- Watch Out for Bogus Plumbing, Heating & Air Conditioning Contractors This Spring and Summer!
- 5 BIG Mistakes Homeowners Make When Replacing Their Heating and A/C Systems...
Your Basement Stinks!
 What You Can Do If Your Cellar's a Smeller!
If you’ve ever spent time in a stuffy, musty basement you don’t need anyone to tell you how unpleasant the smell can be. Worse than dirty gym socks, worse than rotten eggs, worse than…well, there aren’t many things that smell worse. A smelly basement is especially problematic for homeowners who want to use their basement as additional living space for a den, extra bedroom, or entertainment room -- or if you're looking to sell your home.
Where is That Basement Smell Coming From?
Usually, bad basement smells come from humidity and moisture that comes up from the ground. Because the basement is below ground level, this moisture never really goes away and just keeps accumulating. Mold and fungus grow and spread, causing the unpleasant smells. The only way to permanently get rid of odors is to get rid of the moisture.
While totally removing moisture and condensation from your basement is not realistic, there are plenty of steps you can take to dramatically reduce the amount of moisture entering the space and eradicate that horrible musty basement smell.
Cover Sources of Basement Moisture
Dirt that is left exposed will attract moisture, which then seeps into your basement through the foundation and leaves behind a nasty smell. You can try to fix this problem by covering the dirt around the outside of your home with plastic sheeting, mulch, or gravel. This should help block some of the moisture and improve the smell in your basement.
Exposed water pipes may get cold and collect condensation, allowing moisture to build up. Insulating pipes in and around the basement can really help reduce moisture and tamp down the smell.
Turn Up the Heat
Moisture and heat generally do not get along. One of the best ways to eliminate excess condensation in your basement is to crank up the heat. If your home’s HVAC system doesn’t have a control for the basement, you can try one of these alternatives:
- Open basement window curtains to let warming sunshine in during the day. Shut them at night to hold heat in and prevent overnight condensation when temperatures drop.
- If your boiler or furnace is located in a separate basement room, leave the door open to allow heat from the unit to raise the temperature in the rest of the space.
- Place a small space heater in the basement and run it whenever someone is home. Even a few hours of extra heat can make a big difference.
Air It Out
Improving air circulation through your basement can help dry up moisture and get rid of bad smells. Installing an exhaust fan in the basement is a good idea, as is running a simple standing or box fan. In pleasant weather, open basement windows to let fresh air into the room. And putting your laundry dryer in the basement, with the outgoing air vent directed out of the basement, can also help improve air flow and dry the air.
Dehumidify Your Basement
Perhaps the most effective way to eliminate moisture from a musty, moldy basement is to get a dehumidifier. These devices pull moisture from the air, collecting water in a built-in reservoir. Empty the basin regularly and you’ll have a fresher, more pleasant basement.
Install a Sump Pump In Your Basement
If your foundation rests over a well or water table and if your basement is prone to dampness, groundwater leaking and flooding, consider installing a sump pump in your basement. Sump pumps funnel and collect basement moisture in a pit dug into the foundation and pump it out of your home. A Horizon Services plumbing technician can recommend and install a sump pump system that's ideal for your basement.
Could It Be Your Sewer or Water Lines?
Is the smell especially foul? The source could be sewage waste slowly seeping into your basement due to obstructions in or damage to your main sewer and water lines leading out of your house. Over time, these lines can rsdily clog up with waste; crack, bend or break; or even be penetrated by creeping roots from trees and shrubs. This can cause sewage to back up into your home or seep your yard and foundation into your basement.
One sure sign of sewer and water line problems, besides the smell, is if water does not flow easily down your toilet, sinks or tubs, or makes unusual gurgling, bubbling sounds when it does. If you suspect such a problem, don't delay: call a professional sewer & water line repair/replacement contractor like Horizon Services. If left untreated, the problem could result in a major backup of sewage waste into your home; this is not only extremely unsanitary, it can result in permanent damage to floors, carpets and other parts of your home.
Related Information from Horizon Services...
- Horizon Plumbing Services
- Horizon Sewer & Water Line Replacement Services
- Make Sure You're Covered for Sewer Backups
- Keep Your Home Free from Mold and Mildew
Related Blog Posts...
- Landscaping to Avoid Root Infiltration
- Home Sewer Line and Drain Disaster Prevention
- Common Sump Pump Problems Solved
- Got Mold?
- Common Drain, Sewer and Water Line Problems
- Do You Need a Sewer Line Replacement?
- Your Guide to Humidifiers and Dehumidifiers
- Get to Know Your Sump Pump!
- Choosing the Right Humidifier for Your Home
- Prevent Frozen Pipes Now!
Think You Can Take On That Bathroom Remodeling Project?
 Before You Decide to Do It Yourself, Read This!
With one of the highest rates of return on investment of any home improvement, bathroom remodeling not only adds value to your home, but also is a major selling point for potential buyers. However, when you consider everything that goes into a quality bathroom renovation, the costs can add up quickly. From fixtures to plumbing to floors to paint, you may find yourself in over your head before you even begin. Add expensive labor costs and contractor fees and you may start to think that doing the work yourself is not a bad idea. But before you undertake a major bathroom renovation project on your own, think about it carefully.
Sure, you can manage to finish all the work yourself but can you manage to make it look great? We all want to save money, but none of us wants oddly cut tiles, crooked wallpaper, peeling paint,leaky pipes an uneven toilet, or any one of the number of other little mistakes that can creep their way into an amateur remodeling project. Make sure you’re ready for—and can live with—a finished job that looks like you did it yourself.
Have you ever planned and executed such a project before? Not everyone has the eye, the vision, the understanding, the attention to detail, or the focus to properly design a bathroom themselves. And have you ever actually performed any of the remodeling tasks that your plan calls for or used any of the tools required to do the job? If you are inexperienced or just all thumbs, you may be biting off a lot more than you can chew.
Are you basing your bathroom remodel on something you got from a home improvement book or magazine? Sure, on paper it may seem like a simple, step-by-step process. But remodeling a bathroom is not like baking cookies. All homes and bathrooms are not alike, and a cookie-cutter, one-size-fits-all design project may simply not work for your bathroom situation.
Does your municipality require permits for such work? If so, do you know how to acquire them? Plumbing and remodeling contractors can get these permits easily; do-it-yourselfers may not know the proper channels.
If you’ve ever attempted a do-it-yourself home improvement you know how hard it can be to overlook even the smallest mistake once the project is complete. Your eyes go over and over that one spot that looks less than perfect or that dark corner that just doesn’t seem right. If you’re the kind of person who is uncomfortable with imperfection or can’t deal with your own failures then it may be better to leave the job to a professional.
One of the best things about hiring a pro is that they know people. And not just any people. They know people who can get great deals on everything from light fixtures to faucets to custom tiles. You probably do not know these people. A professional can help you get the best price on the best materials; you could actually end up paying more by doing things on your own.
Home improvements take time. In some cases, they can take lots of time—time away from your spouse, your kids, your normal life. Before you undertake a major renovation like a bathroom remodel, make sure you consider the toll it may take on your personal life and your relationships. Annoying delays and setbacks can pile up, making what once seemed like a simple project drag on for weeks or months. Unless you’re truly prepared for the unknown, you may want to leave things to the pros.
Bathroom upgrades are not a simple home improvement project. You may be reluctant to spend money on hiring a professional, but this is really the only way to avoid costly mistakes. It is possible, though, to save money even if you go with a pro. Here are some ways how:
- Buy your own fixtures instead of paying the contractor’s mark-up.
- Remove tile and flooring yourself if your plan is to replace it anyway.
- Take on painting and tiling on your own. Even if you’re a total novice, you can do a good job with a little practice.
Related Bathroom and Plumbing Information from Horizon Services...
- Horizon Plumbing Services
- Horizon Drain Cleaning Services
- Horizon Sewer Line Services
- How To Properly Use a Plunger to Unclog a Toilet, Sink or Tub
- Winter Plumbing Maintenance Tips
- 9 Ways to Save Water
Related Blog Posts...
Know Your Heating System Operation Costs
 Ongoing Costs of Operation Are Just As Important as the Upfront Costs of Purchase and Installation
Buying a new home heating system is an important investment. The right heating system for your home will not only keep you and your family warm and safe, it will also run smoothly with minimal problems. It could significantly lower your monthly heating costs, and it can even enhance the value of your home. And, since this is an investment you’ll probably live with for years to come, you’ll want to invest wisely.
When shopping for a new heating system, you need to compare not only the initial cost to buy and install the system, but also how much it will cost you, on average, to operate your system.
Make sure you know the energy efficiency of the heating system you are getting. Older, conventional furnaces or boilers can often have an energy efficiency lower than 65%. Today’s more efficient heating systems have efficiency ratings that range from 78% to 97% for forced air systems and 80% to 95% for hot water systems. That’s why upgrading to a new, more efficient heating system has the potential for reducing your monthly heating bills by 20-40%.
The extra money you spend for a high-efficiency heater or heating system will pay you back in energy savings in a relatively short time. For example, suppose you are choosing between a heating system with an efficiency rating of 78% and one with a rating of 93%. The higher-efficiency heating system will cost $500 more, but will probably save you, on average, about $137 each year in operating costs. So you will recover the $500 additional upfront cost in less than five years. That's a big saving.
If you are not planning to stay in the home long enough to reach the payback point, you may wish to choose a lower-priced heating system. But remember, a high-efficiency heating system can be a good selling point when it comes time to sell your home.
Our Recommendation: Schedule a FREE In-Home Comfort Analysis from Horizon Services. One of our experienced Comfort Consultants will come to your home, study your house from top to bottom, get a sense of your heating requirements, then give you a complete report with recommendations on a heating system that is just right for your situation, as well as assist you in determining how much you can actually expect to save in monthly heating costs by upgrading to a more efficient heating system.
Related Heating System Installation Information...
Winter Window Warmers
 Insulated Window Treatments Conserve Energy, Increase Comfort
If rising fuel and heating prices have you searching this winter for energy-saving alternatives that are easy on your already tight budget, consider insulated window treatments. No matter where you live, these specialty drapes will help cut your energy and heating costs while adding a little style to any room.
One of the biggest areas of heat loss in most homes is drafty old windows and doors. Even tiny openings can suck out a significant amount of heat, forcing your home’s heating and cooling system to work harder and costing you more money on utilities. Fortunately, it is pretty easy to remedy the situation without spending thousands of dollars on new windows.
First, be sure your windows and doors are sealed as well as possible. Re-caulk and replace worn weather stripping to fix drafts. After all, putting up insulated window treatments won’t do much to combat ill-fitting widow sashes and door seals.
Once you have ensured that all the windows in your house are sealed up tight, there are lots of options for insulating your home with window treatments.
Cellular Shades:
Many of the industry’s top manufacturers now market cellular shades that incorporate single, double, and triple layers of cells to absorb drafts and stop heating or cooling loss. These shades are available in a variety of light control strengths, from semi-opaque to blackout. In terms of style, there is a wide range and you should not have any trouble finding something to complement your décor.
Insulated Drapes:
This is another great way to insulate your home without sacrificing style. Choose a heavy fabric to ensure the best possible result, or consider combining an insulated shade with coordinating traditional curtains for a more customized look. For the ultimate energy savings, pair insulated drapes with cellular shades to restrict heating and cooling loss nearly completely.
Plantation Shutters:
Often used simply for aesthetic purposes on a home’s exterior, plantation shutters actually do a fairly decent job insulating windows and preventing heat and energy loss. Composite or vinyl shutters are particularly effective for insulation. While plantation shutters cannot quite compare to cellular shades or insulated drapes, they do offer a decent amount of insulation when fully closed.
Additional Winter Window and Heating Tips:
No matter which kind of insulated window treatment you choose, be sure to install it as flush with the panes as possible. This will ensure the treatment is able to perform as effectively as possible.
Budget and style preferences will typically dictate which kind of insulated window treatment you select for your home heating and comfort needs. Though the most expensive, triple layer cellular shades are the most efficient and may be especially helpful if you live in a really cold climate.
Over time, any investment in insulated window treatments will pay for itself in a relatively short time thanks to heating savings and general comfort. You will pay less on your heating and energy bills and will be able to enjoy the perfect indoor temperature throughout your home.
Insulated window treatments can be found at most retailers including home improvement stores, discount stores, department stores, and specialty home interiors stores.
Related Heating and Energy Information from Horizon Services...
Landscaping to Avoid Root Infiltration
 Natural Ways to Protect Sewer Lines and Septic Tanks!
If you're a homeowner, it is extremely important to take care of your sewer line system or septic tank to prevent costly damage. Root infiltration is one of the most common causes of damage sewer lines, pipes and septic storage tanks. Over time, sprawling roots from trees and shrubs can make their way through thin cracks and holes in pipes, lines and tanks. Once they've penetrated, they can continue to grow, creating a major blockage that cause unsanitary sewage and waste water to back up into your home...or to leak and soak through the soil in your lawn.
To avoid root infiltration damage, try to avoid planting trees and plants with long root systems or that require a great deal of moisture within the vicinity of your main sewer line or septic tank. These plants will seek out and gravitate toward pipes, lines and tanks. Instead, stick with these sewer and septic safe alternatives.
- Grass: Plain old lawn grass is one of the best (and safest) things you can plant over your septic tank or main sewer line. The roots are very short and grass is relatively easy to care for. Try Kentucky bluegrass or Rye grass, be sure to mow regularly, and treat yearly with a weed-killing formula.
- Perennials: Perennial plants and flowers -- like daisies, daylilies, and poppies -- come back year after year. These plants are a good choice because they are low-maintenance and inexpensive. When planting perennials over a septic tank or the path of a sewer line, lay down topsoil at least six inches deep and cover with a layer of mulch to keep the soil from eroding.
- Wildflowers: Wildflowers also have short root systems that won’t reach deep enough to damage your sewer line or septic system. They provide great color, thick coverage, and a distinct look to any area of your yard. You can purchase individual packets of wildflower seeds in coordinating colors to give your planting structure or choose mixed seeds for a more casual, random garden. Be sure to put down an inch or two of good quality top soil so your wildflower seeds will sprout.
- Septic Tank Mix: Septic tank mix, or prairie mix, is a blend of wildflowers and wild grasses. It’s easy to plant, sprouts quickly, is super-low maintenance, and doesn’t require a bed of topsoil in order to flourish. Septic tank mix is often recommended by professionals because it absorbs excess moisture from the ground and has a very short root system. You can find prairie mix in any lawn and garden or home improvement store.
- Ornamental Grass: Ornamental grasses are also easy to grow and don’t require much maintenance. They tend to spread but don’t grow deep, so there’s little chance of the roots damaging your sewer lines or septic tank. The simplest way to start growing ornamental grasses is to purchase a starter plant in a small container from your local garden center. Once it’s replanted in the ground over your septic tank or sewer line, it should start to spread out within a few weeks. There are plenty of colors and varieties to choose from, making it easy to create a custom look for your home.
- Container Gardens: Most septic tanks need maintenance or repairs at some point. If you’ve invested a lot of time and money planting in this area, you could face a significant loss if the ground must be disturbed. An easy way to avoid this while still adding beauty to your yard is by arranging container plantings over the septic tank. Flowers, grasses and other plants can be potted in attractive containers and set over a layer of pea gravel. That way, if you ever need access to the underground parts of your septic system, you can simply move the containers out of the way until the work is finished.
Repairing and replacing sewer lines and septic tanks can be quite expensive and usually requires digging and tearing up large patches of your yard. Adding these plants can not only help you avoid these costly and destructive repairs, they can also give your yard added beauty and attract songbirds and butterflies.
Related Information from Horizon Services...
Get Rid of Nasty Garbage Disposal Odor
 Take Care of Sink Stink...Once and For All!
If your kitchen is beginning to smell like the local landfill but you just can’t figure out why, it could be the garbage disposal. An often overlooked source of unpleasant kitchen odors, the garbage disposal can collect bits of food and waste that rot and cause nasty smells. The following tips can help you clean out the garbage disposal and eliminate garbage disposal odor.
The Basic Approach: Soap and Water
Once a month or so, plug the sink with the stopper and fill the basin with hot water and about 1/8 cup of grease-cutting dish soap. Take out the stopper when the sink is full and run the garbage disposal as the water and soap drain. This should not only remove trapped waste but will also help clean out the pipes for a fresher smelling sink.
The Commercial Approach: Disposal Deodorizer
There are several different garbage disposal deodorizers on the market. You’ll find these chemicals -- usually in liquid, gel, or dissolvable tablet form -- at most supermarkets and home improvement stores. They can be costly, but if used regularly as directed they can help clean out the garbage disposal and prevent odor build-up.
The Natural Approach: Vinegar and Citrus
Vinegar is a powerful and effective cleaning agent that’s been used around the house for decades. It’s a great deodorizer despite its pungent odor and also has some antibacterial properties. There are two ways to use vinegar to remove odors from your garbage disposal:
- Vinegar and Ice: Fill an ordinary ice tray with a 50/50 mixture of water and plain white vinegar (use more vinegar if your drain is particularly smelly). When the cubes freeze, run cold water into the sink and run the ice through the garbage disposal. The vinegar will eliminate bad smells and the ice will help sharpen the garbage disposal blades. Use this method two or three times a month and be sure to clearly label the ice tray so no one accidentally uses a vinegar cube in their drink.
- Vinegar and Baking Soda: Cover the inside of the drain with baking soda and pour in a half cup of white vinegar. Let the mixture sit for at least an hour. When time’s up, run cold water down the drain as you run the garbage disposal. Once the vinegar smell is gone, the nasty smells should disappear, too.
Another natural way to freshen your garbage disposal is with citrus fruit. Orange, lemon, lime, grapefruit -- choose the scent you prefer, drop the peels into the drain, and run the disposal. Citrus juice or pieces of the fruit would work, too. Just be sure to cut the fruit or peels into small pieces so they don’t damage the garbage disposal blades.
The Classic Approach: Bleach
Household bleach is another great all-around garbage disposal cleaning agent. Simply plug the sink and fill the basin with a mixture of water and a little bit of bleach. Slosh everything around with a plastic spoon or your hand (wear rubber gloves!). Let the mixture sit for about half an hour, and then unplug the drain. The bleach will clean and deodorize the garbage disposal, eliminating any bad smells.
WARNING:
NEVER put your hand or fingers down the garbage disposal unit. Even if the switch is off, it could easily flip on and your hand or fingers could be sliced or mashed. If you have food or other items stuck down in the garbage disposal, try to remove with prongs or pliers. If you cannot remove the items, call the plumbing and drain pros at Horizon Services; we'll quickly and safely remove the object.
Related Garbage Disposal Information from Horizon Services...
How To Clobber Those Really Tough Drain Clogs
 When Plungers Fail, Kick It Up a Notch!
Nobody likes having a clogged sink, toilet or tub. For most people, drain clogs rank at or near the top of life's list of inconveniences. It’s probably a safe bet that you can work a plunger or have had to use an over-the-counter chemical drain cleaner to unclog a problem drain. And in most cases, these time honored drain cleaning tactics will do the job nicely. But when these traditional clog-busting methods don’t work or you’re dealing with a particularly nasty clog, what can you do? Time to pull out the big guns!
Get Physical to Clean the Drain
If you’re tried a plunger or chemical drain cleaner and the clog still hasn't been cleare, you may need to take a more physical approach. You can purchase a plumbing snake for around $20 at most home improvement or plumbing supply stores. These long, thin tubes go straight down the drain to catch and remove hair, debris and sludge that have caused the clog. If your sink is blocked, clean out the trap and feed the snake into the pipe that way. Try covering the overflow valve to build up pressure that can help blast the clog away.
A power auger is an even more powerful physical option to stubborn clogs. You should only use an auger if you have more than basic plumbing experience so you don’t risk damaging your plumbing. If you don’t feel up to the task yourself, it’s best to call in a professional plumber. The upside of hiring a pro is that he or she can do a whole system inspection to make sure you don’t have to deal with tough clogs again.
The Non-Chemical Approach to Drain Cleaning and Maintenance
Commercial chemical drain cleaners usually contain harsh chemical agents that cause nasty fumes, burn your skin and damage your clothing, floors and surfaces. They can also be quite expensive. For a cheaper, greener approach, a solution of plain old baking soda and vinegar or boiling water can do the trick on many clogs. The most common cause of drain clogs is accumulated hair, so adding a bit of hair removal cream to the drain can help break up the clog.
To maintain a clear drain, use an enzyme culture solution once a month to break down grease and debris; these all-natural, organic products can also eliminate odors from pipes and drains. You can find these products at most home and hardware stores.
If you do go the chemical route, don’t ever mix cleaners; the chemicals can react violently and cause serious damage to pipes or septic systems, not to mention produce harmful vapors.
When All Else Fails, Call The Pros!
If you’ve tried all the above methods to clear your clogged drain, then your problem is probably more serious than just a run-of-the mill clog. You could have significant accumulation of hair or grease...or a foreign object may have become lodged in the drain. Even worse, your could a broken or leaking pipe somewhere in your drain system. If left untreated too long, these issues can compound and lead to more serious problems that may require a total plumbing and drain system overhaul.
For super-stubborn clogs, call a professional drain cleaning contractor. If these is a good indication that the problem is more serious than a typical clog. Nationwide, the average cost of hiring a pro to unclog a drain is about $250. Though this sounds like a lot for a simple blocked drain, it's better to spend a little now to avoid more costly damage in the future. And if you call the drain cleaning pros at Horizon Services, you get one of the best drain cleaning deals available anywhere: Horizon will clean and clear any drain, any time, any size for the unbeatable price of $149. That's a small price to pay for instant gratification!
Related Plumbing and Drain Information from Horizon Services...
- Horizon Drain Cleaning Services
- Horizon Plumbing Services
- Horizon Sewer & Water Line Replacement Services
- Fast and Easy Dishwasher Care and Maintenance
- Garbage Disposal Do's and Don'ts
- How To Properly Use a Plunger to Unclog a Toilet, Sink or Tub
- Winter Plumbing Maintenance Tips
- 9 Ways to Save Water
Subscribe!


 Posts
All Comments
Posts
All Comments
My Blog List


AddThis

Keystone Partner

Horizon Services is a Keystone Partner of Philadelphia Union, Major League Soccer Team


